
This article will walk you through how to manage users. This includes how to invite users, add a company logo to your email invite, and remove users from a workflow.
Ironclad administrators can manage existing users and invite new users to collaborate using Ironclad. Ironclad supports new user invitations through existing SCIM, SSO, SAML, Google Sign-In integrations, or directly through the Ironclad app. When you invite a new user, Ironclad sends the individual an email notification containing a link to join Ironclad.
For SCIM, SSO, SAML, and Google Sign-in integrations, you can deauthorize users through your integration service. If you have an SCIM integration configured with Ironclad, review our user management instructions for Azure, OneLogin, and Okta.
Manually Invite a New User
If your Ironclad Account has an SSO, SAML, or Google Sign-In integration configured, you can manually invite them to Ironclad. You can select whether they are added to Ironclad through SSO or email/password. (If you want to change a user's log in method after they have logged in for the first time, submit a request with our Support Team.)
Please ensure that all team members that you want to invite to Ironclad are provisioned and added to those integration services before inviting the users.
You can invite users to your account that already are part of additional accounts in Ironclad.
- Click on your profile icon located in the top right corner of Ironclad. Navigate to Company Settings > Users.
- Click Invite User.
-
Enter the email addresses of the individuals you want to add, hitting
the [Enter] key after each email. You can also copy
and paste a list of email addresses, separated with commas.
- You can also re-invite users who were previously removed from your account. Email invites are sent to each user, and they will be listed in the Users tab with Pending invitation until they accept the invitation.
- In the Add to groups dropdown, select any groups you would like the new users to be automatically added to. If you want to learn more about groups and the associated permissions, refer to Manage Groups.
- You can also select the Sign-in Method to select how the user will be required to sign in. Options may vary depending on what SSO/Identity provider options you have integrated with your instance.
- Click Invite. Email invites are sent to each new user. You can review the status of each pending invitation on the Invites tab.
Add Users to Another Instance of Ironclad
-
Click on your profile icon located in the top right corner of Ironclad. Navigate to Company Settings > Users.
-
Click Invite User.
-
An invite is emailed to the user. The user must accept the invite to gain access to the Ironclad instance.
Invite a User to Join an Active Workflow
- Click the Dashboard tab, and then select the workflow you want to invite the user through.
- In the Activity Feed, @mention the user. Click Add Comment.
Review Seat Allocations & Usage
Note: This feature is enabled automatically for those with Admin, Standard, Requester, and Viewer seat types, and its availability may be subject to subscription entitlements.
Add Company Logo to New User Email Invite
- Click on your icon located in the top right corner of Ironclad. Navigate to Company Settings > Profile.
- Click Upload.
- Select an image. We recommend uploading a .png with a maximum width of 200 pixels.
- Click Upload.
Manually Remove a User
If you are an Ironclad Admin, you can manually remove users. If you are part of a large organization, the change can take some time to go into effect.
- Click on your profile icon located in the top right corner of Ironclad. Navigate to Company Settings > Users.
- Click the three dots next to the user, then select Remove User.
- If the user is assigned to any active or paused workflows, you are prompted to reassign these workflows to another user. You can also reset approvals for workflows where the user is a reviewer. Click Remove User. This action cannot be undone. While you can contact Support to add the user to Ironclad again, this will not carry over the user's previous workflows and settings. It will be as if you are adding a new user.
Remove Users in Bulk
The only way to remove users in bulk is by using SCIM (see Use Okta SCIM in Ironclad for more details). If your team isn’t using SCIM, you’ll need to remove users individually.
Remove a Participant or Leave a Workflow
Sometimes, you may no longer need a specific user to participate in a workflow. Common situations that cause this are job changes, team re-organizations, or the user having no further action to take. If you are a workflow owner or account administrator, you can remove internal workflow users who are no longer required, were invited by error, or opt to leave a workflow when you have no role or action to take.
There are two exclusions to this functionality:
- Users with assigned workflow roles such as approver, signature coordinator, etc. cannot be removed from a workflow until that role is reassigned, due to the critical nature of their participation.
- You cannot remove external workflow participants such as counterparty invitees.
If you wish to remove a participant who occupies one or both of these roles, please reassign or transfer the role to another team member first.
Participant View
Workflow Owner / Company Administrator User view
- Click the Dashboard tab, and then select the workflow you want to invite the user through.
- In the Participants section, click Manage. A list of participants displays.
- If you want to remove a participant, locate the participant you want to remove and click Remove. You can add participants again in the future if the needed.
- If you want to remove yourself, click Leave Workflow.
View a User’s Details and Permissions
When you click on a user on the Users page, the User Detail panel displays on the right. This panel provides a comprehensive view of the user's profile and permissions. This allows admins to confidently audit and edit user access.
User Information
In this tab, you can view the user’s profile information and group membership. If you want to update a user’s group assignment, click a group’s name and you are directed to the group’s page to make any necessary changes.
User Seat Type Tab
In this tab, you can view all permissions and group assignments that determine the user’s current seat type. The panel is divided into three sections: Administrator, Standard, and Requester/Viewer. Expand each section to see which groups the user belongs to and how those memberships contribute to their permissions.
To update a user’s group assignment, click a group’s name and you are directed to the group’s page to make any necessary changes.
Change a User's Email Address 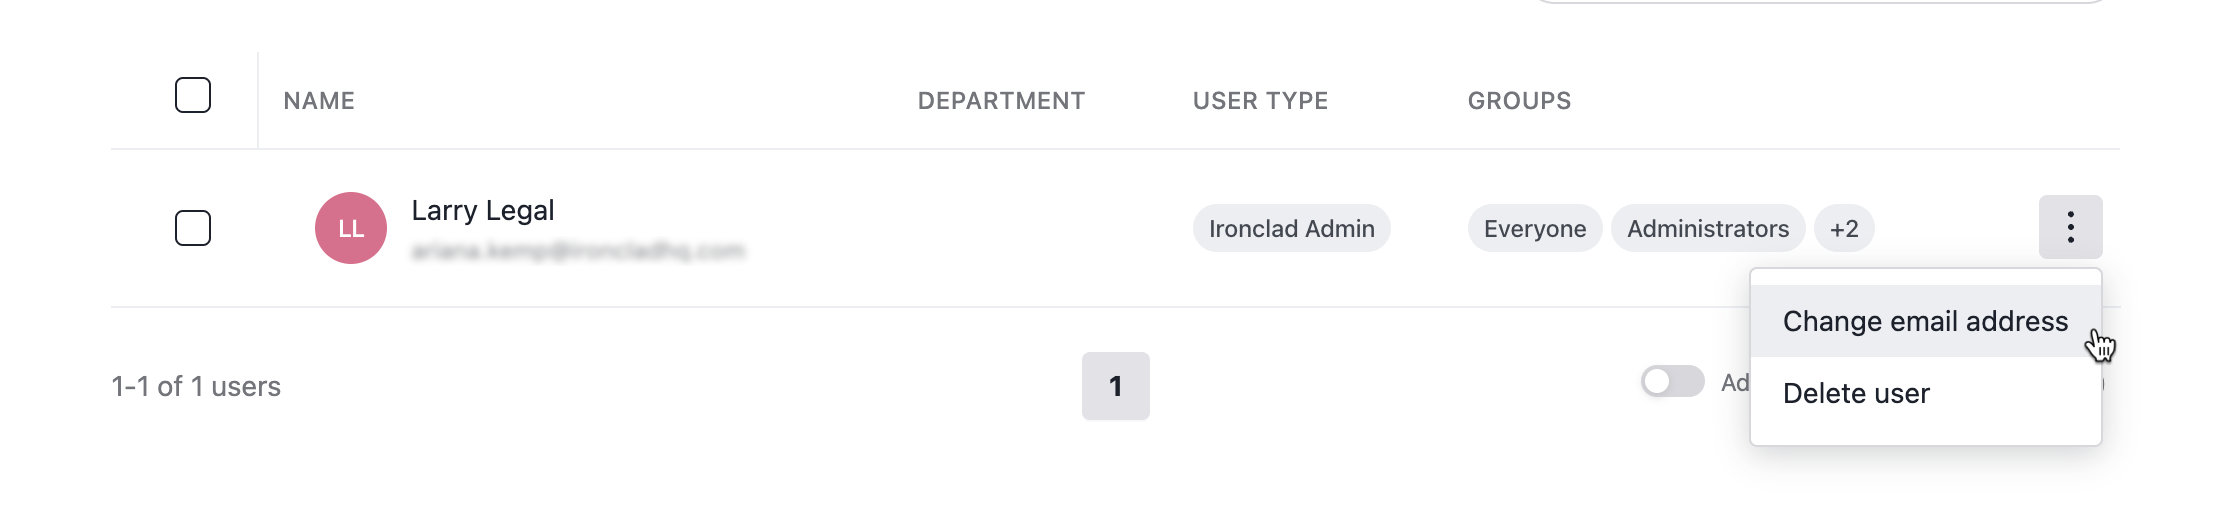
- Click on your profile icon located in the top right corner of Ironclad. Navigate to Company Settings > Users.
- Click the three dots next to the user, then select Change Email.
- Enter the new email address, then click Save.
Assign a Default User
We highly recommend that everyone assigns a default user within their Ironclad instance. The default user is the user that Ironclad will default to if there is ever a crisis or urgent problem that needs resolved. If you do not designate a default user, we will continue to use the first user created in your Ironclad instance.
Workflow Reassignment
Historically, if a user left your company, you had to reach out to Ironclad for them to manually reassign the previous employee's in progress workflows to the default user. With this new functionality, workflows are automatically reassigned to your default user if a someone is removed from Ironclad via SCIM.
- Click on your profile icon located in the top right corner of Ironclad. Navigate to Company Settings > Users and Groups > Groups.
- Click on the Administrator group.
- Locate the user you want to make the default user. Click the three dots located in the same row, and then click Make default user.
Filter Users
You can filter by:
-
User Type: You can filter by your users’ seat types. This includes Ironclad Admin, Administrators, Standard, and Requesters.
- When you are filtering by User Type, there are two user types that must be distinguished from one another: Ironclad Admin and Administrators. The Administrator seat type is assigned to users with admin level permissions and users assigned the the Administrator group. The Ironclad Admin seat type is assigned to Ironclad employees who may have a user in your instance. This most often occurs during implementation.
- Group: You can filter by which groups your users are a part of.
-
User: You can filter by a specific user or multiple users.
- Click on your profile icon located in the top right corner of Ironclad. Navigate to Company Settings > Users.
- Set the User Type filter by selecting one or more user types to narrow down the list of users.
- Set the Group filter by selecting one or more groups to narrow down which users are a part of those groups.
- Set the User filter by selecting one or more users to narrow down the list of users.
Deactivate and Reactivate Users
Release: The following features and functionalities will go live on June 11, 2026. To learn more about what's included in our June release, refer to What's New in Ironclad: June 2026
Admins can revoke access and free up licenses without deleting users or immediately reassigning all of their workflows.
To deactivate a user:
- Click your profile icon in the top right corner and select Company Settings from the dropdown menu.
- Click Users in the left sidebar menu.
- Select the user you want to deactivate.
-
Note: You can only deactivate one user at a time. If you select more than one user, you won't see the option to deactivate.
-
- Click Deactivate User.
- Review the workflows that the user is assigned to, and confirm your choice by clicking Deactivate.
-
Optional: You can reassign workflows at this step by checking the Reassign workflows option in the pop-up modal.
-
Once you've deactivated the user, they will appear with a Deactivated user status on your Users page.
Another way to deactivate a user is to click the More options icon (vertical ellipsis) to the right of any user and select Deactivate User, the user is assigned a Deactivated user status.
To reactivate a user, you can follow the same steps used to deactivate them and selecting Reactivate User instead.